Click here to download Video that Shows Installation of jdk
1. How To Install JDK on Windows
Step 0(a): Un-Install Older Version(s) of JDK/JRE
I recommend that you install the latest JDK, but it can be messy if you have multiple versions of JDK/JRE.
If you have previously installed older version(s) of JDK/JRE, un-install ALL of them. Run "Control Panel" ⇒ Program and Features ⇒ Un-install programs begin with "Java", such as "Java SE Development Kit" and "Java SE Runtime". If you are not sure whether you have older version(s) of JDK, check!
Step 0(b): Understand Windows' CMD Shell
Programmers need to know how to use CMD shell to issue commands. If you are completely new to CMD, read "Programmer's Survival Guide for Windows".
Step 1: Download JDK
- Goto Java SE download site @ http://www.oracle.com/technetwork/java/javase/downloads/index.html.
- Under "Java SE 8ux", click the "Download" button under "JDK".
- Check "Accept License Agreement".
- Choose your operating platform, e.g., Windows x86 for 32-bit Windows OS or Windows x64 for 64-bit Windows OS. You can check whether your Windows OS is 32-bit or 64-bit via "Control Panel" ⇒ System ⇒ Under the "System Type".
Step 2: Install JDK and JRE
Run the downloaded installer (e.g., "
jdk-8uxx-windows-x64.exe"), which installs both the JDK (Java Development Kit) and JRE (Java Runtime). By default, the JDK will be installed in directory "C:\Program Files\Java\jdk1.7.0_xx", where xx denotes the latest upgrade number; and JRE in "C:\Program Files\Java\jre8".
For novices, accept the defaults. Simply click "next"..."next"... to install JDK in "
C:\Program Files\Java\jdk1.8.0_xx" and JRE in "C:\Program Files\Java\jre8".
Take note of your JDK installed directory (which you will need to use in the next step). Check the JDK installed directory by inspecting these folders using Windows' Explorer.

I shall refer to the JDK installed directory as
<JAVA_HOME>, hereafter, in this article.Step 3: Include JDK's "bin" Directory in the PATH
Windows OS searches the current directory and the directories listed in the
PATH environment variable for executable programs. JDK's programs (such as Java compiler javac.exe and Java runtime java.exe) reside in directory "<JAVA_HOME>\bin" (where <JAVA_HOME> denotes the JDK installed directory, e.g., C:\Program Files\Java\jdk1.8.0_xx). You need to include the "<JAVA_HOME>\bin" directory in the PATH.
To edit the
PATH environment variable in Windows 2000/XP/Vista/7/8:- Click "Start" button ⇒ "Control Panel" ⇒ "System" ⇒ (Vista/7/8 only) "Advanced system settings".
- Switch to "Advanced" tab ⇒ "Environment Variables..."
- In "System Variables" box, scroll down to select "
PATH" ⇒ "Edit..." - (CAUTION: Read this paragraph 3 times before doing this step! There is no UNDO) In "Variable value" field, INSERT "
c:\Program Files\Java\jdk1.8.0_xx\bin" (Replacexxwith the upgrade number and VERIFY that this is your JDK's binary directory!!!) IN FRONT of all the existing directories, followed by a semi-colon (;) which separates the JDK's binary directory from the rest of the existing directories. DO NOT DELETE any existing entries; otherwise, some existing applications may not run.Variable name : PATH Variable value : c:\Program Files\Java\jdk1.8.0_xx\bin;[exiting entries]
(For Advanced Users Only)
I suggested that you place the JDK bin directory in front of "
c:\windows\system32" and "c:\windows". This is because some Windows systems may have an out-dated copy of JDK/JRE in these directories. Do a search for "java.exe", and you will be amazed by the findings.
You could read "Java Applications and Environment Variable" for more discussions about
PATH environment variable.
I also recommend that you define an environment variable called
JAVA_HOME, which contains the JDK installed directory, and include the JDKbin directory in the PATH via JAVA_HOME, i.e., PATH=%JAVA_HOME%\bin;.....Step 4: Verify the JDK Installation
Launch a CMD shell (Click "Start" button ⇒ run... ⇒ enter "
cmd"; or "Start" button ⇒ All Programs ⇒ Accessories ⇒ Command Prompt).- Issue a "
path" command to list the contents of thePATHenvironment variable. Check the output and make sure that<JAVA_HOME>\binis listed in thePATH.prompt> path PATH=c:\Program Files\Java\jdk1.8.0_xx\bin;[other entries] - Issue the following commands to verify that JDK/JRE are properly installed and display their version:
prompt> java -version
java version "1.8.0_xx"
Java(TM) SE Runtime Environment (build 1.8.0_xx-b13)
Java HotSpot(TM) 64-Bit Server VM (build 25.5-b02, mixed mode)

prompt> javac -version
javac 1.8.0_xx
Step 5: Write a Hello-World Java Program
- Create a directory to keep all your works, e.g.,
d:\myproject, or any directory of your choice. Do NOT save your works in "Desktop" or "Documents" as they are hard to locate. The directory name shall not contain blank or special characters. Use meaningful but short name as it is easier to type. - Launch a programming text editor (such as TextPad or NotePad++). Begin with a new file and enter the following source code. Save the file as "
Hello.java", under your work directory (e.g.,d:\myproject)./* * First Java program to say Hello */ public class Hello { // Save as "Hello.java" under "d:\myproject" public static void main(String[] args) { System.out.println("Hello, world!"); } }
Step 6: Compile and Run the Hello-World Java Program
- To compile the source code "
Hello.java":- Start a CMD Shell (Click "Start" button ⇒ Select "run..." ⇒ Enter "
cmd"; or "Start" button ⇒ All Programs ⇒ Accessories ⇒ Command Prompt). - Set the Current Drive to the drive where you saved your source file "
Hello.java". For example, suppose that your source file is saved in drive "d", enter "d:" as follow:prompt> d: D:\xxx>
- Set the Current Working Directory to the directory that you saved your source file via the
cd(Change Directory) command. For example, suppose that your source file is saved in directory "d:\myproject".D:\xxx> cd \myproject D:\myproject>
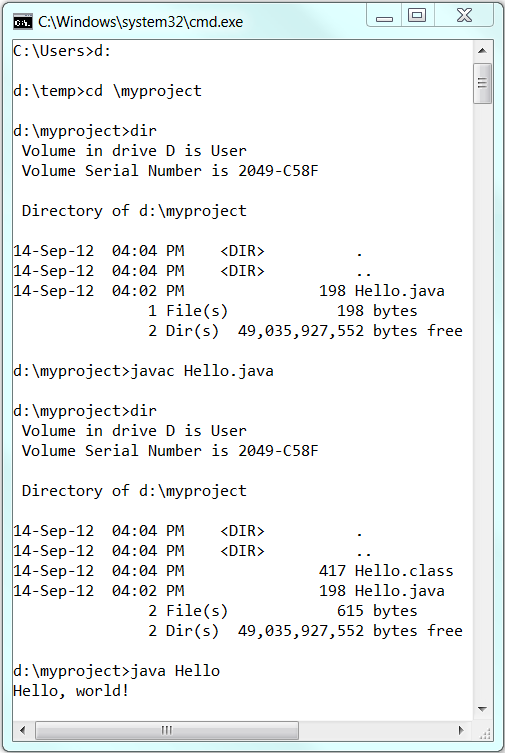
- Issue a
dir(List Directory) command to confirm that your source file is present in the current directory.D:\myproject> dir ...... 08-May-XX 06:25 PM 277 Hello.java ......
- Invoke the JDK compiler "
javac" to compile the source code "Hello.java".D:\myproject> javac Hello.java
The compilation is successful if the command prompt returns. Otherwise, error messages would be shown. Correct the errors in your source file and re-compile. Check "Common JDK Installation Errors", if you encounter problem compiling your program. - The output of the compilation is a Java class called "
Hello.class". Issue adir(List Directory) command again to check for the output.D:\myproject> dir ...... xx-xxx-xx 01:53 PM 416 Hello.class xx-xxx-xx 06:25 PM 277 Hello.java ......
- Start a CMD Shell (Click "Start" button ⇒ Select "run..." ⇒ Enter "
- To run the program, invoke the Java Runtime "
java":D:\myproject> java Hello Hello, world!
Everything that can possibly go wrong will go wrong: Read "JDK Installation Common Errors".
Step 7: (Optional) Download JDK API Documentation, Samples and Demos
The JDK download does not include the documentation, which needs to be downloaded separately. In the past, I always insist that my students should have a local copy of JDK API Documentation. But, today, you can easily access the online copy by googling "JDK 8 Documentation".
To install JDK API documentation:
- From the Java SE download page (@ http://www.oracle.com/technetwork/java/javase/downloads/index.html), under "Additional Resources", look for "Java SE 8 Documentation" ⇒ Download ⇒ Accept the license agreement ⇒ Download the zip-file (e.g., "
jdk-8uxx-apidocs.zip" - about 85MB). - Unzip into the
<JAVA_HOME>(JDK installed directory). The documentation will be unzipped into "<$JAVA_HOME>\docs". Browse the JDK documentation by opening "<JAVA_HOME>\docs\index.html".
You should also download the "JDK 8 Samples and Demos" from the Java SE download site.
Step 8: (For Advanced Users Only) JDK's Source Code
Source code for JDK is provided and kept in "
<JAVA_HOME>\src.zip". I strongly recommend that you to go through some of the source files such as "String.java", "Math.java", and "Integer.java", under "java\lang".
No comments:
Post a Comment